jQuery was introduced in 2006 by John Resig. Since then, it has become one of the most popular Javascript libraries in use today. jQuery was designed to make Javascript easier to use in client-side scripting. It was written with designers in mind.
The jQuery Library is open-source, free, and unencumbered by licenses. It boasts an active and committed community of designer/developers. It is cross-browser and cross-platform friendly, with lots of widgets and plug-ins available.
Student Outcomes
- Learn about selectors and wrappers.
- Learn how to walk the DOM with jQuery.
- Understand toggling.
- Learn about showing and hiding.
- Learn how to add and remove classes, as well as transversal techniques.
- Learn about the "this" keyword.
- Learn about working with CSS and jQuery together.
Assignments
- Assignment 12.1: Shape and Color Sorter
- Assignment 12.2: Project 3: Personal Portfolio
Assignment 12.1: Shape and Color Sorter
Description
Please recreate the shape and color sorter demonstration file and the expander page from this class, using your own images and design.
Purpose
The purpose of this assignment is to review the basics of jQuery selectors, events, transversal methods, and simple effects. The two demonstration pages are designed to help you understand:
- jQuery selectors
- Transversal techniques in jQuery
- Loops in jQuery using the each() method
- The "this" keyword
- The show(), hide(), slideUp(), slideDown() and slideToggle methods
- The addClass() and removeClass() methods
- Manipulating the value of attributes
Assignment 12.2: Project 3: Personal Portfolio
Description
For this project you will be building a portfolio of your work. The portfolio will serve as a vehicle for you to display your work as you progress through your degree program. You are building a website for yourself to display your growing skills. This portfolio will evolve over the course of your education. As you take more courses you will have more work to show.
This is a professional portfolio, and as such it is a more targeted site. You should select and carefully edit the work you want to show. This portfolio is a demonstration of your professional skills and judgment.
Your target audience includes your department director, instructors, classmates, and eventually, future employers. You will use this site as part of your mid-point review presentation. The committee will want to know more about you. They will need to see demonstration of your technical skills as well as your design skills. As you think about this portfolio, consider how you want to be perceived and design accordingly.
Your portfolio should include the following sections:
- Home: to establish the look and feel of your site. To inform the users what to expect in your site.
- Personal history/Artist's statement (optional): this can be incorporated in the home page if desired.
- Resume: Must be in HTML with CSS. You can link to a PDF as well, but there needs to be an HTML version incorporated in the site.
- Portfolio: Include carefully chosen examples of your work. How you present them is up to you, but be sure that they read well on the Web. Extremely large images and videos will need to be optimized, and in some cases reduced to work well. If you have professional experience and wish to show some of that work as well, you should do so.
- Contact Page (Optional)
Final content and page list will vary somewhat from student to student -- the important thing is that the final piece fairly represents you.
A further consideration is that your portfolio is a "living" document. It is not a static brochure, but rather a growing, evolving site. As you think through the navigation, keep in mind that you will be updating this site in the future to include a growing body of work.
Each page must include:
- The site name and any branding you want associated with you
- Global navigation to all the sections of the site
- Local navigation, where appropriate
- A breadcrumb trail where appropriate and only if your site is deep enough to require one
- The section title
- The page title
- The content
- A foot with a copyright
If you already have a portfolio that you like and fits you well, you can propose to create another site, but you will need to show your site and get approval. Everyone in this program is required to have a web-based portfolio.
Continue coding and begin production work on your content -- Continue making your pages and refining your code. Make any last tweaks to your designs as you code. Make sure all your pages validate. Separate the CSS out into external sheets and link to your external CSS. If you are going to need any special kind of interactivity, begin planning for it now. If you want to use some Javascript or Javascript Libraries, start looking the code you will need.
Technical Requirement
This is a web-based portfolio. You should design using web "friendly" technologies. The site should be developed in HTML with external CSS and JavaScript. You may use Flash to enhance your site with animation and interactivity. This is an HTML class -- you may not build a Flash site. You may include sound files, video, animation, and anything else you feel will show your work off in its best light.
Purpose
- To create a showcase for your growing body of work.
- To gain experience designing a site that will be updated on a regular basis.
- To gather examples of your work and collect your creative history as a student.
downloads: basic css jQuery

first test page jQuery

DOWNLOAD THE SHAPES AND COLORS
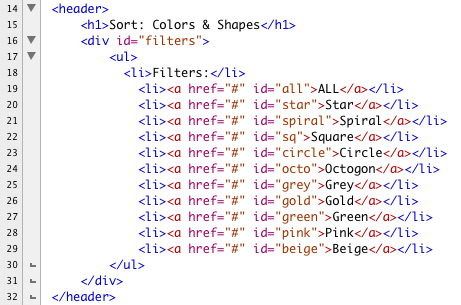 To the header tag, add an h1 with an appropriate page title. Below it, add a div with the id "filters." Inside the div, nest an unordered list of all the possible sort filters -- be sure to include an "all" option. Wrap the contents of the li tag in an a tag. Give each a tag a unique id named for the shape or color it represents, like this:

In the content div, add a second unordered list. Place an image tag inside each one and pull in all your images. To the li, add a class attribute. Add two classes to the attribute: the color and the shape. It doesn't matter what order the class names are in, just be sure that there are two of them and that they are separated by a single space. If you named your images well, for the color and the shape, this step will be easy.


Our last function, the one that shows everything, doesn't require an argument. It will have the sensible name "showAll()." It uses the each() method to loop through all the li tags in content and show them, once again, using the "this" keyword.
 Next, we need to add the event listeners to the filter buttons. All of the filter buttons except the "all" button do pretty much the same thing. On the click event, they call showHide() and pass in the class that matches. They then call the toggleSelectd() function and pass themselves in as the recipient of the selected class. Below is the call that the star button makes:


jQuery provides pinpoint access to any and every element in the DOM of your page. It uses both tag names and all the same selectors you use in CSS. It even supports the advanced selectors and filters available in CSS that never got full browser support. The advanced CSS3 selectors have not been fully implemented by the browsers yet, and that's a shame. They are powerful and useful.
| If you're interested in what will be coming, you can read a good overview here: http://www.456bereastreet.com/archive/200601/css_3_selectors_explained/ |
The basic selectors are exactly what you would expect. They are the same as in CSS:
Class Selector ".class": Selects all items with a given classElement Selector "tagname": Selects all elements with a given tag nameId Selector "#id": Selects individual elements with a given idWild Card "*": Selects all elementsMultiple Selectors "selector1, selector2, selector 3": Collects all the elements specified by the the listed selectors
jQuery evaluates your page and grabs all the elements requested. It puts them in a wrapped set, making manipulating the set more convenient. A couple of examples will make this clearer.
On test.html, just below the msg div, add a div with the id "container." Inside of container, add a ul of fruit and vegetables. Mix them up randomly. To the fruits on your list, add the class of "fruit" to the li tag. For the vegetables, add the class of "veg" to the wrapping li. Here is the updated code:

| You can find out more about selectors in the documentation at jQuery.com:http://api.jquery.com/category/selectors/ |
| All the traversing methods are documented at jQuery.com: http://api.jquery.com/category/traversing/ |
show() and hide()
The art of interactive design is being able to deliver the correct granularity of information on demand. jQuery is a boon to interactive designers because it makes this process so much easier. Along with all the selectors and tools for traversing the DOM are a host of methods for applying effects. There are sliding methods, fade in and fade out methods, animation methods, and much more. Most of them have toggle methods to make putting together stylish UIs easier. Representative of these methods are the show() and hide() methods.
Both the show() and hide() methods can be used without additional parameters, like this:
$('p.blue').show();
This line of code would gather all p tags with the class "blue" and pop them into view. Optionally, you could add a duration value measured in milliseconds, like this:
$('p.blue').show(500);
This adds animation. The blue paragraphs will now draw into the page over half a second. There are also two generic keywords for duration -- "slow" and "fast" -- that are used like this:
$('p.blue').show('slow');
You can even include a "callback" function that fires when the animation is complete.
Underneath the ul, add a new div with the id "box." Below it, add a paragraph. In the paragraph, add two links. The first is labeled "show" and has an id in the a tag of "show." The second is labeled "hide" and the a tag has the id "hide."
These small animations are powerful tools in any UI designer's tool kit. Nothing focuses the eye like a brief animation.
|
DOWNLOAD THE SHAPES AND COLORS
Sorting by Shape or Color
Let's put this all together and do something a bit more interesting. We are going to make a page of images that can be sorted by shape or color. To complete the following demonstration, you will need between 15 and 25 images. The demonstration uses 25 images -- five different shapes in five different colors. Below is the master image that was sliced up into individual images. For the sake of clarity, the individual images were named for both shape and color, like this:
- star_grey.gif, spiral_grey.gif, sq_grey.gif, etc.
- star_gold.gif, spiral_gold.gif, sq_gold.gif, etc.
- star_green.gif, spiral_green.gif, sq_green.gif, etc.
First the HTML. The HTML is not particularly complex; in essence, it is two wrapped lists. Duplicate your template page and name the new page "m12_sort.html."
Below the script tag that pulls in the html5shim.js file, add a script tag to the head of the document. Point the src attribute at the jquery.js file in the js folder.
Add a div to the body tag. Give the div an id of "container." Inside container, add a header tag, a second div with id "content," and a footer tag:
 To the header tag, add an h1 with an appropriate page title. Below it, add a div with the id "filters." Inside the div, nest an unordered list of all the possible sort filters -- be sure to include an "all" option. Wrap the contents of the li tag in an a tag. Give each a tag a unique id named for the shape or color it represents, like this:
In the content div, add a second unordered list. Place an image tag inside each one and pull in all your images. To the li, add a class attribute. Add two classes to the attribute: the color and the shape. It doesn't matter what order the class names are in, just be sure that there are two of them and that they are separated by a single space. If you named your images well, for the color and the shape, this step will be easy.

Next we will write the styles. We have two lists that need to be styled. Remove the links to basic.css. It is more than we really need for this exercise. Instead, we will include a handful of basic styles and reset the browser defaults where needed. Remember, header and footer need to be told to display as blocks.
Set the width of container to be a percentage, in this case 80%. This will force the grid to be fluid.
Below are the basic styles that the demonstration file uses:

The filters are more interesting. We've sequestered the ul inside the filters div. This makes the CSS a little simpler to control. Since we are going to float all the li elements into a horizontal bar, we can float the parent ul left. This gives us control of the entire bar.
The list items (li) have their list style removed; they are floated left and have a bit of margin. The top margin is relatively tall. Because grid is fluid, this list will at times wrap, and we want to be sure there is enough top margin to give the buttons clearance.
The nested a tags have transparent backgrounds, thanks to rgba and radial backgrounds. In IE 8 or below, these will look like text links, which is perfectly acceptable.
The a tag gets a contextual hover treatment -- see Line 42 below.
Lastly, we create a class named "selected" to highlight the option chosen. Notice that this class can only be applied to an a tag nested inside a li tag that is a child of filters.
 |
Like the buttons, the images are in an unordered list. The list is nested inside a containing div with the id "content." Since we are creating the grid of images using floats, we can use content to shrink-wrap the grid by adding a float:left to content.
The individual li tags have margins, padding, and borders added. The list-style is removed and they float left.
 |
And finally, the footer receives a little CSS:
Here is the CSS in full:
 |
Writing the jQuery
writing the jQuery
Before we begin writing the code, let's think through what it needs to do. When a filter button is clicked:
Before we begin writing the code, let's think through what it needs to do. When a filter button is clicked:
- The button calls a function and passes to it the name of the class to be shown.
- Each list item is looped through in turn. If it has the correct class, it is shown using the show() method. If not, it is hidden using the hide() method.
- If the all button is clicked, then every list item, regardless of class, is shown.
- The button that was pressed calls a function and passes its id in. All of the filter buttons are looped through. If one of them has the selected class, the class is removed. The button that called the function then has the class added to it.
We will need three functions.
The first is a function to show or hide the correct list items. This is the function that our filter buttons will call. The function needs to know which images to show. We can use the classes to flag the correct images. Our function will take one argument -- the name of the class to show. Our function is named "showHide()".
showHide() works by looping through each of the li tags in the content list using the each() method. The jQuery each() method is the equivalent of a for loop in Javascript. To use it in jQuery, use your selectors to wrap a collection of elements. The each() method goes through the wrapped set, one element at a time, making the evaluation. It looks like this:
$('#content li').each();
Inside the each() parentheses, you write what you want to have happen. In our case, we want to take a look at the value of the class name that was passed into our function. If the li has a class that matches the value, then it should be shown. If not, it should be hidden.
Here is the function in full:
 |
The "this" keyword is used to allow an object to refer to itself. As the each() method progresses through the list of li elements in content, each element is evaluated in turn. Each element becomes "this" element as it is evaluated.
Our second function will be used by the filter buttons to highlight the chosen button. Remember the class we defined called "selected"? When a button is clicked, it will receive the "selected" class. The previous button will have the selected class stripped off. The second function also takes a single argument -- the name of the button that was clicked.
To make getting the class attribute added and removed, we'll use jQuery's handy addClass() and removeClass() methods. They do exactly what you would think they would do. The addClass() method will add whatever value is specified as a parameter of the method.
The removeClass() method is attached to the element that you want to remove the class from. It strips the class off. If there is no class in the first place, then it fails silently.
Our second function's name is toggleSelection() and is passed the id of the button that was clicked. It uses the each() method to loop through all the a tags that are wrapped by li tags in filters div. Again, the "this" keyword is used with each a tag in turn. The class is stripped off the a tags.
Then the a tag that was clicked has the class "selected" added to it and the button is restyled to be highlighted. Here is the function:
Here is the function:
 |
Be sure to add all three functions to your script tag.
Next, we need to add the event listeners to the filter buttons. All of the filter buttons except the "all" button do pretty much the same thing. On the click event, they call showHide() and pass in the class that matches. They then call the toggleSelectd() function and pass themselves in as the recipient of the selected class. Below is the call that the star button makes: |

For the sake of space, if we stretch those out into a single line, we can add all the event listeners like this:

The all button gets a slightly different event handler. It calls the showAll() function before calling the toggleSelected() function. It looks like this:

Add all the events and their event handlers to your script. Below is the completed code:

Save and open your page in a browser.