At the very very latest you may hand in your work on May 19th by 8pm.
You will be sending a ZIPPed file of your portfolio and a ZIPPED file of your demo library (class work)...
This is the very latest you may hand in your work. You must also provide links to the sites in your email.
If you don't... nothing good may come!
Monday, May 14, 2012
fullscreen background slideshow
Supersized is a fullscreen background slideshow built using the jQuery library.
http://buildinternet.com/project/supersized/slideshow/3.2/demo.html
and slide deck
http://www.slidedeck.com/blog/looking-ahead-upcoming-features-in-slidedeck-2-1/
http://www.sublimetext.com/2
portfolio projects
Portfolio
http://amanda-morgan.com
Site Library
Portfolio
http://www.songkhunhirunro.com/
Site Library
http://www.songkhunhirunro.com/wnm608/shwnm608.html
Portfolio
http://www.songkhunhirunro.com/shc_proto/shcindex.html
Site Library
http://www.jamie-wang.com/wmn608/m13/library/index.html
Portfolio
http://www.jamie-wang.com/portfolio/
Portfolio
http://bananshalabi.com/myportfolio5/
Site Library
http://bananshalabi.com/library/
Site Library
http://www.guangyuyang.com/Midterm_Guangyu_02717669/main.html
Portfolio
Site Library
Site Library
Portfolio
last class: jQuery UI makes it easy to include complex interactions & advanced effects
http://feliciachamberlain.com/syllabi/larrySample.html
jQuery UI is built on top of the jQuery library. You need to link to a copy of jQuery first, before evoking any of the effects, widgets or interactions in jQuery UI.
jQuery UI makes it easy to include complex interactions, advanced effects and some of the more common UI components in the form of widgets. All widgets come with a nice selection of skins called "themes." the themes are written in CSS with images and are highly customizable. You can find a complete description of the library and complete documentation at:
http://jqueryui.com/home
http://jqueryui.com/download
You will see that the download page is organized to let you pick and choose what you need.
UI Core: These are the core classes that make up the jQUery UI library. They are the foundation and are required as they contain the basic functions and initializers. These include
http://feliciachamberlain.com/m14_examples.zip
http://feliciachamberlain.com//artsmart2012/_wnm608/m14/m14_examples/m14_drag.html
http://feliciachamberlain.com//artsmart2012/_wnm608/m14/m14_examples/m14_drop.html
http://feliciachamberlain.com//artsmart2012/_wnm608/m14/m14_examples/m14_accordion.html
http://feliciachamberlain.com/syllabi/walrus.swf
http://feliciachamberlain.com//artsmart2012/_wnm608/m14/m14_examples/m14_slider.html
http://feliciachamberlain.com/artsmart2012/_wnm608/wnm608_examples/m14_examples//m14_jqui_1.html
m14_jqui_2.htmlhttp://feliciachamberlain.com/artsmart2012/_wnm608/wnm608_examples/m14_examples//m14_jqui_2.html
jQuery UI is built on top of the jQuery library. You need to link to a copy of jQuery first, before evoking any of the effects, widgets or interactions in jQuery UI.
jQuery UI makes it easy to include complex interactions, advanced effects and some of the more common UI components in the form of widgets. All widgets come with a nice selection of skins called "themes." the themes are written in CSS with images and are highly customizable. You can find a complete description of the library and complete documentation at:
http://jqueryui.com/home
Downloading jQuery UI
You can customize your download of the jQUery UI library. The download page lets you pick and choose which parts of the library you need so that you can trim the size of your sites and optimize the experience for your users. You can down the library at:http://jqueryui.com/download
You will see that the download page is organized to let you pick and choose what you need.
UI Core: These are the core classes that make up the jQUery UI library. They are the foundation and are required as they contain the basic functions and initializers. These include
- Core -- base class for jQuery UI. This class is required for all interactions, widgets and effects.
- Widget: this is the factory class for the creation of all widgets. It is required for all widgets.
- Mouse: the Mouse class is required for all widgets and interactions that make extensive use of the mouse.
- Position: the Position class is used to help position elements of the library relative to each other.
- Draggable
- Droppable
- Resizeable
- Selectable
- Sortable
- Accodion
- Autocomplete
- Button
- Datepicker
- Dialog
- Progress Bar
- Sliders
- Tabs
- Bounce
- Explode
- Fold
- Pusate
- Scale
- Shake
- Slide
http://feliciachamberlain.com/m14_examples.zip
http://feliciachamberlain.com//artsmart2012/_wnm608/m14/m14_examples/m14_drag.html
http://feliciachamberlain.com//artsmart2012/_wnm608/m14/m14_examples/m14_drop.html
http://feliciachamberlain.com//artsmart2012/_wnm608/m14/m14_examples/m14_accordion.html
http://feliciachamberlain.com/syllabi/walrus.swf
http://feliciachamberlain.com//artsmart2012/_wnm608/m14/m14_examples/m14_slider.html
http://feliciachamberlain.com/artsmart2012/_wnm608/wnm608_examples/m14_examples//m14_jqui_1.html
m14_jqui_2.htmlhttp://feliciachamberlain.com/artsmart2012/_wnm608/wnm608_examples/m14_examples//m14_jqui_2.html
Wednesday, May 9, 2012
Last Class... Last Call...
What's due for next class:
your demonstration library
and
your portfolio
List of items for demo library (course work --in class and homework)
we'll also be covering next class:
accordians
dragging
dropping
sliders
see... but not like this, so much... this is flash. i drew this for a flash drag and drop class sample.
your demonstration library
and
your portfolio
List of items for demo library (course work --in class and homework)
we'll also be covering next class:
accordians
dragging
dropping
sliders
see... but not like this, so much... this is flash. i drew this for a flash drag and drop class sample.
Tuesday, May 8, 2012
Overlay a div with semi-transparent opacity over a youtube
How can I overlay a div with semi-transparent opacity over a youtube iframe embedded video?
http://helpx.adobe.com/x-productkb/multi/swf-file-ignores-stacking-order.html
#overlay {
    position:fixed;
    top:0;
    left:0;
    width:100%;
    height:100%;
    background:#000;
    opacity:0.8;
    /*background:rgba(255,255,255,0.8); or just this*/
    z-index:50;
    color:#fff;
}
Try appending this GET parameter to your URL:


wmode=opaque


like so:


https://www.youtube.com/embed/kRvL6K8SEgY?wmode=opaque
http://helpx.adobe.com/x-productkb/multi/swf-file-ignores-stacking-order.html
Projects in class/hw assignments from WNM 608
working list for the library of projects done in class this semester to be included in the class portfolio (demonstration library):
-click on the hyperlinks to refresh your memory
Template page & two page site
Mini site: Color Site: traversing directories
pancake page
recipe page
positioning
tables
floats: css
more floats
Recipe Site
Lincoln's Second Inaugural Speech
Recipe: full layout
firebug: what a mess!
layout with dots: box properties
drop down menu
drop down with overlay
Fancy form page with lots of style!
gradients
Resize
Exquisite Corpse
positioning (scroller)
Timer
Toggle buttons
Interval
Style changer
Text Scroller
Image sorter
Image gallery
portfolio
Monday, May 7, 2012
class assignments
Jamie Wang: portfolio in progress
Color Mixer
http://www.kominchun.com/aau/
portfolio in progress: songkhunhirunro.com
portfolio in progress: http://amanda-
portfolio in progress: http://bananshalabi.com/
http://alicia-emmaline.com/
Here is my homework for this week:
http://alicia-emmaline.com/
Color Mixer
http://www.kominchun.com/aau/
portfolio in progress: songkhunhirunro.com
portfolio in progress: http://amanda-
portfolio in progress: http://bananshalabi.com/
http://alicia-emmaline.com/
Here is my homework for this week:
http://alicia-emmaline.com/
jQuery SlideShow
download class files here.
the end is near!
Working with jQuery
Overview
As we've seen -- and experienced -- jQuery is a powerful code library
that makes Javascript much easier to write. It gives us access to
tools for creating interesting and useful UIs in a language that is both
intuitive and designer-friendly.
Javascript is the logic layer of our trinity of client-side web
technologies. In this module, we are going to focus on writing logic
using Javascript with a jQuery assist.
Student Outcomes
- Learn about manipulating the DOM.
- Review attr(), fadeIn/fadeOut, and string parsing.
- Learn about building up logic using trace statements.
- Review wildcard selectors.
- Learn about wrapped sets as arrays: length property.
Assignments
- Assignment 13.1: Slideshow & Slideshow with Links (this CAN be the content that's in your portfolio... just don't hand over the same files we do in class)
- Project 2: Finish coding and complete production work on your content for your Final Project...
Building a Full Function Slideshow
In this module, we are going to build a slideshow, using Javascript
and jQuery to handle the logic. Slideshows are popular -- they're a
great way to showcase collections of images. Slideshows can be as simple
as an image with some kind of navigation to get to other images, or
they can be robust, full-featured, application-like affairs.
A robust slideshow should be easy to use and easy to maintain. It
should be well- labeled, with titles that orient the user on the page.
The best slideshows let the user know up front how many images are
available, and offer multiple ways to navigate between the images. Once
an image is chosen, the navigation should give some indication of which
image it is in the flow of the presentation. The images should have
captions that don't obscure the image they caption or use up a lot of
real estate on the page.
Our slideshow will include the following:
- Slideshow title: The title tells the user what the collection is all about.
- Thumbnail navigation: Tiny representations of the enlargements pique the user's interest and encourage exploration.
- Visual representation of how many images are available: Again, thumbnails do this nicely.
- Two different ways to navigate through the enlargements: A thumbnail navigation, plus back and next buttons to walk through the thumbnails.
- A visual cue highlighting which image was chosen of how many: Highlighting the chosen thumbnail helps orient the user.
- Image captions: The captions can float on top of the enlargement to save space. They can also be hidden on demand to allow the user to enjoy the enlargements without distraction.
The thumbnails tell the user immediately how many images are
available and which thumbnail was clicked; in this case, the Common
American Swan. There are handy back and next buttons, just in case the
user would prefer to flip through the images in a linear fashion. This
linear quality will help us as we think through how we are going to
structure the logic to achieve our slideshow.
Duplicate the template folder. Name the new folder "m13_yourlastname."
To complete this demonstration, you will need the following assets:
- A collection of images: Select between seven and 15 images that you want to work with. The demonstration uses 11 illustrations from the great American wildlife illustrator John James Audubon. Store the enlargements in a folder named "images," and place the images folder inside the assets folder.
- Thumbnails, one for each image: Make a thumbnail for each image and store them in a folder named "thumbs." Put the thumbs folder in the assets folder. Make sure that the name of the thumbnail is exactly the same as the enlargement in the images folder. We are going to leverage the use of the same name in different folders to simplify our code. It is critical that the names of the thumbnails match the names of the enlargements.
- A back and a next button: Create two icons that look like they mean "back" and "next," and store them in your assets folder.
- A close icon: the caption will appear over the images. The user will need a close button to make the caption go away.
- Any other additional assets you might want to use in your design. The demonstration file uses a background that looks like old water color paper to set the mood. Other options might include a logo graphic, additional icons or atmospheric images.
Duplicate template.html. Name it "m13_slideshow.html."
Slideshow: Writing the HTML
Initially, the head of m13_slideshow.html is very simple. We're not
really working with much text, so we won't be using the basic.css styles
-- go ahead and remove the link. Instead, keep the link to the
html5reset.css file and add a script tag that pulls in the jquery
library. Be sure you have a copy of the jQuery library in your js
folder. We covered this last class with the jQuery sorter.
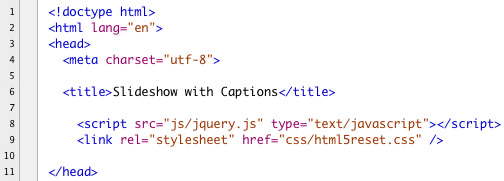
The structure of our page is simple. The entire page is placed in a container div. It includes a title in an h1 tag and a support tag in an h2. The slideshow itself, the enlargement, all the navigation and the caption will be contained inside a div with id of "holder." This is followed by a foot. In this case the demo uses a simple div with id of footer, but you could certainly use a footer tag. Here is the initial page:
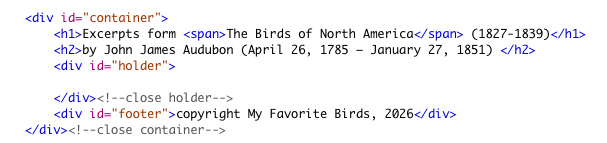
Now to begin filling in the holder div. It needs to have an image tag for the enlargement. Add an img tag to holder. Let the img tag display the first image and give it the id of "lr" for large.
Below the img tag, include a div for the caption. Give it the id of "msg" for message. Inside the div, add an img tag for the close button. Below it, add a p tag with the id of "caption" and put in the appropriate caption for your first image.
Below the caption, add image tags for both the back and next buttons. Give them the ids of "back" and "next," respectively. It doesn't really matter where these are in your code. They are going to be positioned absolutely so that they sit on top of the enlargement.
Here is the container div so far:
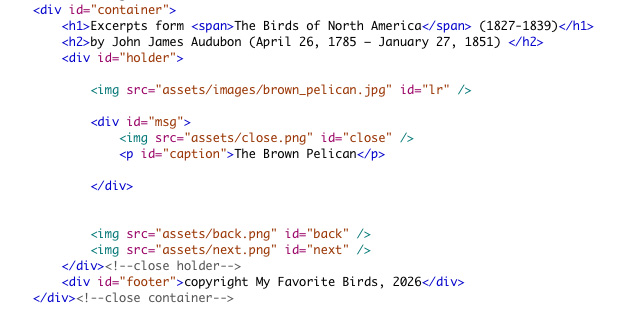
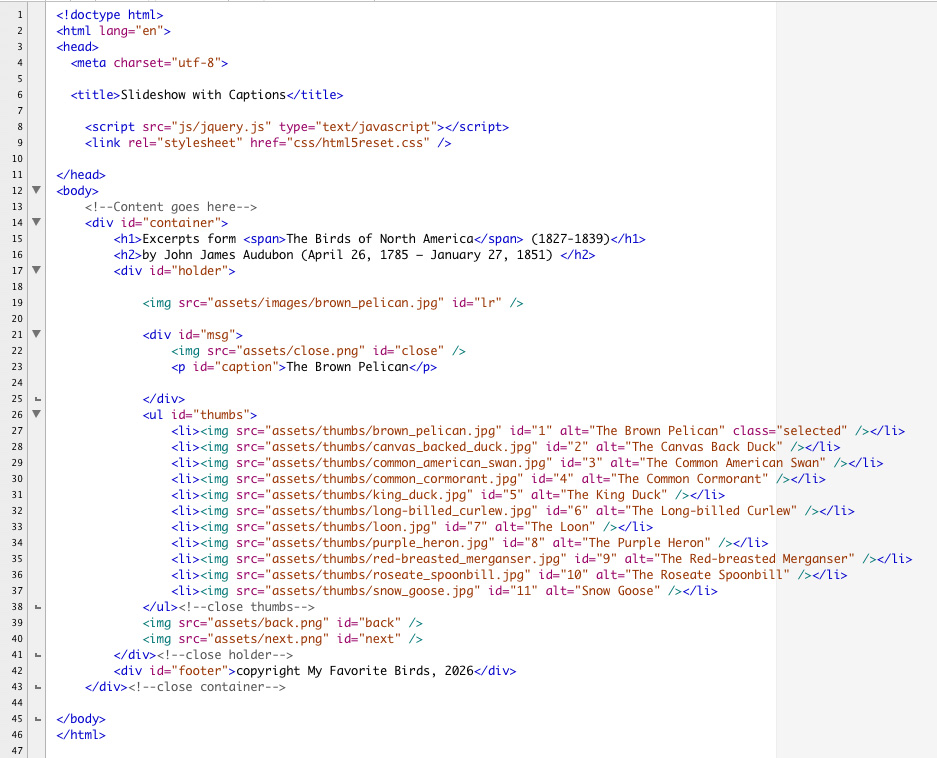
Finally, we can add all our thumbnails. Our thumbnail navigation is in essence a list, so we are going to add all the thumbnails into an unordered list. Give the first image in our list the class of "selected." Place the list between the msg div and the back and next buttons, like this:

As you add your thumbnails, use the alt attribute to hold what you would like the caption for the enlargement to be.
Make sure each thumbnail has a unique id -- the id should be an incremental number. We are going to use this id to count through the thumbnails and keep track of which image is showing. This will greatly simplify our handling of the back and next button.

so here's our code so far...
Slideshow: Adding the CSS
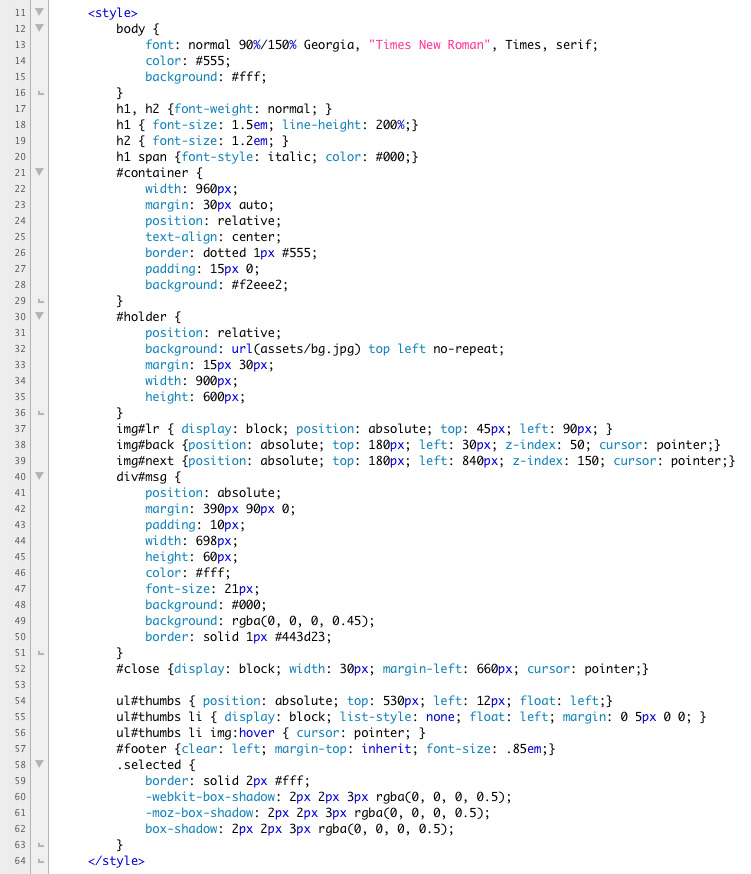
In some ways, the CSS for our slideshow is the most complex part of this demonstration. For the sake of simplicity, the demonstration file includes the CSS in the head of m13_slideshow.html.
In the head of your file, open and close a style tag. Inside it we will start with a few basic styles to handle the body -- the h1 and the h2. Notice that the demonstration uses a nested span tag to italicize name of the book, The Birds of North America, that the images come from.
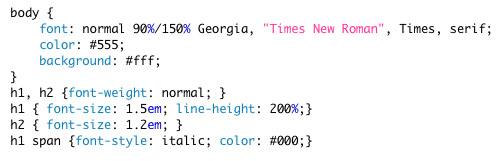
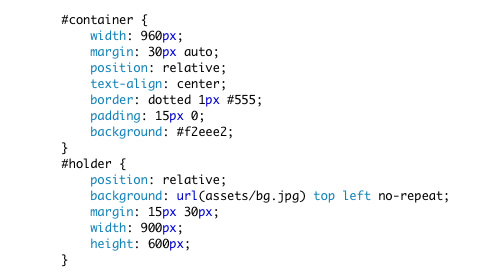
The container div has a width and is centered in the middle of the browser. It has the text-align property set to "center." It has a border, a bit of padding, and a background color.
The holder div has a width and a height as well. Notice that the position has explicitly been set to "relative." This will allow us to use absolute position inside it when needed. Almost everything inside of holder will be positioned absolutely. Here are the container and holder styles:
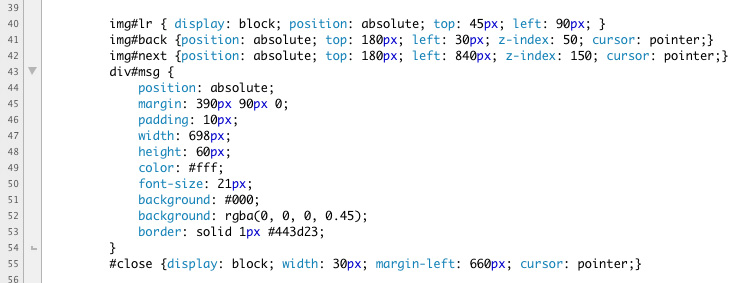
Now we turn our attention to the large image, the back button, the next button, and the message div. All four of these items are positioned absolutely. Since they are wrapped inside of the holder div, which is positioned relatively, they are absolutely positioned in relationship to holder. The large image, the back button, and the next button each get a top and a left position. Both the next and back buttons get z-index as well.
The msg div for the caption is also positioned absolutely. The demonstration file uses the margin to set the top side positions. It could have just as easily used top and left properties. It receives a background color and then the background color is restated in rgba with an alpha of 45%. There is also a bit of styling for the type.
The close button for the caption is nested inside of the msg div. It doesn't need to be absolutely positioned. The cursor property is set to display as a pointer so that it feels more "buttony."
Here are the new styles:
The thumbnails get a special treatment. The entire ul is positioned absolutely. It too is wrapped inside the relatively positioned holder, so the entire unorded list is absolutely positioned relative to holder. The list items are going to float left, so the ul tag is also floated left to shrink-wrap the thumbnails.
The li tags are each told to display as a block. The list-style is removed, and they are individually floated left with a bit of margin to separate them.
Finally, the images have their cursor property set to display as a pointer.
The foot is outside of holder. It is relatively positioned. All it requires is to clear the floats.
We will also need a style for the chosen thumbnail. It is given a border. This is a place where a drop shadow would make the thumbnail float off the surface, giving the slideshow a bit of dimensionality. Remember, drop shadows are a bit like cheap cologne -- a little goes a long way. The new class is named "selected."
Here are the additional styles:

And here are the completed styles for our slideshow
Save your work.


Slideshow: Building Up the Logic
We know how we want this slideshow to function. What we need now is a strategy to guide us as we write our logic.
We have two different ways to navigate through the images. When the user clicks on a thumbnail, the image represented by the thumbnail and its caption display, and the chosen thumbnail is highlighted. Navigating by thumbnails is not locked into any particular order -- it is not linear.
Back and next navigation is linear -- it is a sequential form of navigation. If the user clicks the next button, the next image in the sequence with its caption displays. The next thumbnail is highlighted. If the last image in the sequence has displayed, the next image wraps back to the first image in the sequence. The back button works the same way, only in reverse. When the first image in the sequence has been reached, the back button wraps back to the last image in the sequence.
Once a thumbnail has been chosen, getting the path to the enlargement and the caption to display is easy. The names of the thumbnail images match the names of the enlargements; they are simply in different folders. This is handy. We can split off the file name from the folder path and reassemble it with the correct folder to get the path to the new image. We can also pull out the value of the alt attribute and use it for the contents of the caption. Our list of thumbnails is well-structured -- it doubles as the data for our slide show.
Grabbing the correct image is straightforward when the user is using the thumbnails -- we know which thumbnail was clicked. It's less straightforward when the user is using the back and next buttonsr. How will we know which image is currently showing so we can figure out which one is next or which is previous?
To accomplish this task, we will use the id attributes of our thumbnails. We assigned each thumbnail image a sequential number as an id. Essentially, the ids are a count. This will help us but there is one important fact we need to consider. The id attribute is a string; a count is a number. Here is a place where we can leverage the loose nature of Javascript variable types to our advantage.
Since a variable type can be changed at will, we can treat our our thumbnail ids as strings or numbers. We can pull out the id of a thumbnail and store it. When we use the back or next buttons, the stored id can be evaluated. If the next button was clicked, the stored id as a count can be incremented. The new number can be treated as a string, and voila -- we have the id of the next thumbnail and access to the correct data. The back button works the same in reverse.
Sound complicated? It's not. Let's see it in action.
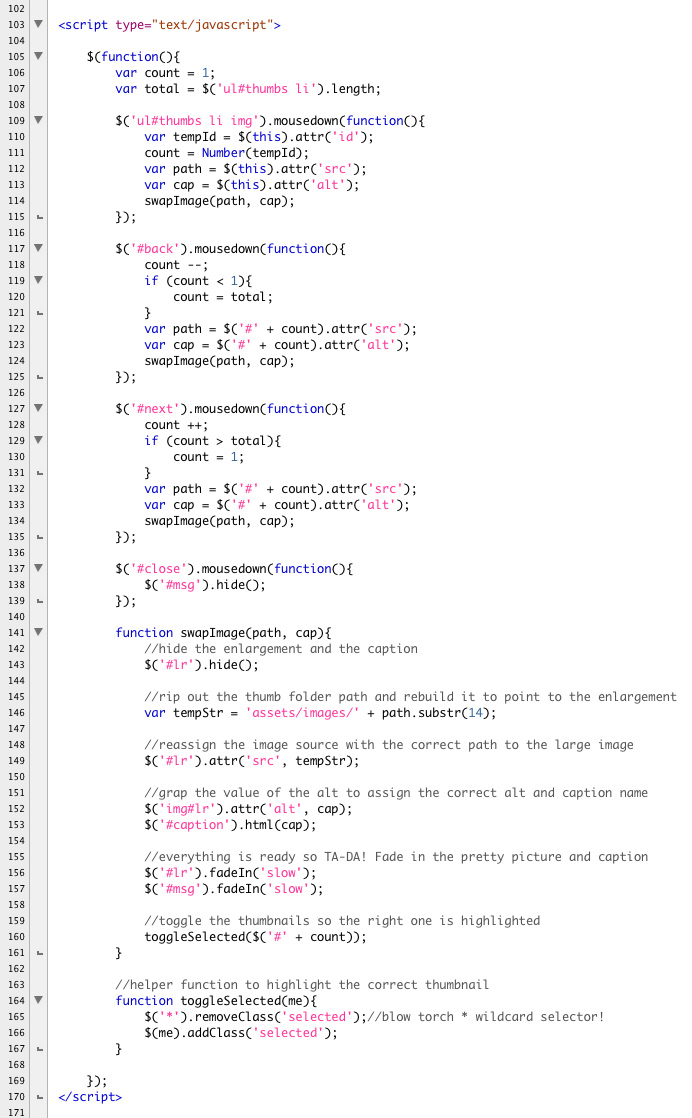
Slideshow: Writing the Javascript
At the bottom of m13_slideshow.html, add and close the script tag, just before you close the body tag. We already linked to the jQuery library in the head of our document. Now we are going to write all our logic in the bottom. It will be the last thing on our page to fire.
Below is the Javascript in full. Before we pull the code apart and break it down line by line, take a moment to read through the code on your own. See if you can follow the logic. The most difficult parts are heavily annotated.
Slideshow: Breaking Down the Javascript
The script begins with the call to the jQuery ready function:
$(function(){});
The handy jQuery function, $(); fires when the page has completed loading. This ensures that all assets are available to the script. Inside of our jQuery call, we add an annonymous function.
The first thing we need are two helpful variables. The first is called "count." We will use count to track which thumbnail is showing.
The second -- called "total" -- is a shortcut designed to save on typing later on. It retrieves the total number of li tags in our unordered list with the id of thumbs. Notice we could have more lists on this page without disturbing our slideshow.
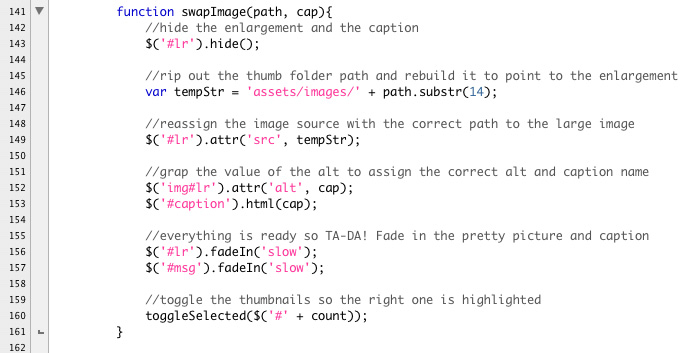
The heart and soul of this script is the swapImage() function. Review the function, we will break it down line by line below:
Swapping Out the Image and the Caption
The swapImage() function is responsible for displaying the correct image and the correct caption, and updating count so we can track which image is showing. It requires two pieces of information: the path to the thumbnail and the caption text. These are passed in as parameters to the function. The parameters are named "path" and "cap."
path: This is the full URL to the thumbnail image. The swapImage()function will discard the folder names and pull out the name of the file itself. The correct folder name is then added to the file name to form the correct path to the enlargement.cap: The text for the caption is the value of the alt attribute.
The foot print of swapImage() takes this form:
function swapImage(path, cap){}
Line 143 hides the img tag with the id "lr." We want our slideshow to be smooth and have a polished feel. While we're fiddling with the img tag, it's best to hide it. Then, when it's ready to show, we can fade it in gracefully with the new caption.
Line 146 is where things get interesting. Here we create a local variable named "tempStr," short for "temporary string." This is where we create the correct path to the enlargement. We use Javascript's substr() method to extract the file name. The substr() method is very similar to the substring() method we used in the scrolling image file we made in Module 11. Its footprint looks like this:
substr(start, length)
The substr() method is used to extract characters from a string beginning with the "start" parameter. Optionally, it will pull out just a specified number of characters. It returns the new sub string. The start parameter is required. The length parameter is optional. If the length parameter is omitted, then the default is to use the rest of the string.
The path to our thumbnails all start with the folders -- assets/thumbs/. That's 14 characters. Once those are peeled off, we are left with the file name. Add the string assets/images/, and we have the correct path to the enlargement. Line 146 reads:
Now we have the correct path. Line 149 uses jQuery's handy attr() function to reassign the value of the src attribute. The attr() method can take one or two parameters. It can be used to retrieve the value of an attribute if it is past the attribute's name. This is how we're going to get the value of the alt attribute. An example of this kind of usage might usage might look like this:
var myAlt = $('img.prettypicture').('alt');
The above code fragment stores the value of the alt attribute in the variable "myAlt".
You can also use the attr() method to reassign the value of an attribute. And that's what we are doing here in Line149. We're passing the new path to the src attribute of the lr img tag. Now it will display the new image:
The variable "cap" that we passed in to swapImage() is the alt attribute from the chosen thumbnail. It can now become the alt tag for enlargement. (Yes; we are writing standards-compliant code here.) In Line 152, we use the attr() method to pass the value of cap to the alt attribute.
Line 153 uses the html() method to add the value of cap to the p tag with the id of "caption."
 |
Everything is ready. In our last module, we used the show() and hide() methods. Here we are going to use the fadeIn() method. It works the same as show() and can take a duration parameter. It also has companion methods:
.fadeIn(duration): Fades in the requested element of the course of the duration..fadeOut(duration): Fades out the requested element of the course of the duration..fadeToggle(duration): Toggles the value of the fade. If the element is opaque, it fades it out. If is transparent, it fades it in..fadeTo(duration, opacity): Fades an element to a specific opacity.
| For more details review: http://api.jquery.com/category/effects/ |
Line 156 fades in lr, Line 157 fades in msg.
 |
Remember count? It is a global variable, defined on the root of our code. The value of count is updated by the individual thumbnails, the back button, and the next button when they are clicked. With the correct image showing with the correct caption, we need to highlight the selected thumbnail. We are going to write a function to handle the update next. Our swapImage() function calls the toggleSelected() function and passes in count. Notice that we are concatenating a string by adding the string fragment "#" to count. We've just created a valid id.
 |
Save your page.
Highlighting the Correct Thumbnail
Since we've seen the function call, let's turn our attention to toggleSelected(). This function removes the class "selected" from all the thumbnails and then adds the class to the correct thumbnail. To accomplish this task, we're going to use jQuery's removeClass() and addClass methods. This makes adjusting the styling of objects incredibly simple, since a style was defined for "selected" in the CSS.
The toggleSelected() function takes one parameter -- the id of the thumbnail that will get the "selected" class.
Line 165 uses the wildcard selector "*" to remove the selected class from anything in our document that might have it. Using the wildcard selector is a little like taking a blowtorch to your code -- it touches everything on your page. Use with care.
Line 166 adds it to the correct thumbnail.
 |
Save your page.
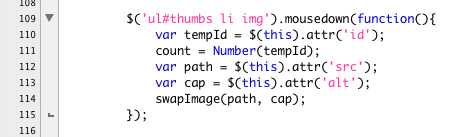
Adding the Event Listeners
The swapImage() function is called from thumbnails. Line 109 adds the mousedown() event to the thumbnails. Notice that the selector to the thumbnail img tags leverages the cascade. Our code is only assigned to images wrapped in an li tag that inherits from an unordered list with the id of "thumbs."
Line 109 uses the mousedown() event. There are lot of different user events in jQuery. They have slightly different names than their Javascript counterparts. They also have very precise meanings. You can sculpt the interactivity by carefully selecting the right event listener.
| For a complete listing, read: http://api.jquery.com/category/events/ |
Line 110 creates a local variable to temporarily store the value of the id attribute, using the attr() method. Notice the use of the "this" keyword. In this context, the code fragment $(this) refers to each individual image in turn. When a thumbnail is clicked it becomes "this" and refers to itself as "this."
Count is a global variable. It is a number; ids are strings. Line 111 casts tempId as a number using the Number() object and stores the result in count. The variable count must be preserved as a number.
Lines 112 and 113 pull out value of the src attribute and the alt attribute.
Line 114 passes them into the swapImage() function.
 |
Save your page.
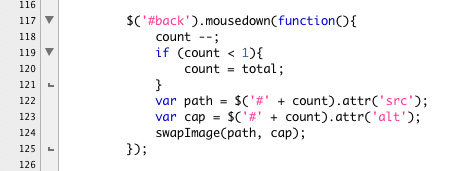
The Back and Next Buttons
The back and next buttons work very similarly to the thumbnails. Where they differ is in their treatment of count. The back and next buttons call the new enlargements sequentially. They handle count as a number, and this is why we have been so careful to preserve count as a number type. Variable types is a very important part of Javascript, made all the more perplexing because Javascript is loosely typed.
Line 117 adds the mousedown() event to the back button.
Line 118 decrements count. The code fragment below:
code --;
is a shortcut. It means to subtract 1 from the value of count. It is exactly the same as writing:
code = code - 1;
Now you can appreciate why count is a number. If count is accidentally converted to a string, this line of code will fail.
Lines 119 through 121 check the value of count. If it is less than 1, it resets the value to be equal to total, the total number of thumbnails. This is the wrap.
Lines 122 through 124 do exactly what the thumbnails did -- they grab the value of the scr and alt attributes and make the call to swapImage().
The construction $('#' + count) creates the correct id. This is a concatenation. We are adding a string ("#") to a number(count). The result is a string. The id attribute is a string.
 |
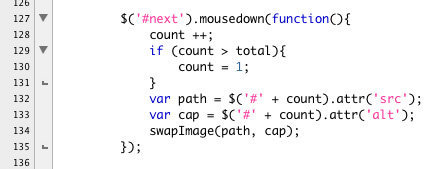
The next button perfectly mirrors the back button. In this case 1 is added to count using:
count ++;
This is the shortcut for:
count = count + 1;
The value of count is checked against the value of total. If it exceeds total, it is reset to 1.
 |
Line 137 assigns the mousedown() event to the close button. The close button hides the msg div on Line 138.
 |
Save your m11_slideshow.html file. Open it in a browser and enjoy your handiwork.
Extending the Slideshow
This is a basic but full featured slide show. There are a lot of ways you could extend it. Some possibilities night be:
- Use the image scroller from Module 11 as a thumbnail menu for the slideshow.
- Hide the caption on first loading the image and provide an information button that the user could click to show the caption.
- Make the captions more robust by pulling in external files to show in the caption area.
- Make the caption display and size dependant on the content so that you could show more complex information.
- Suppress the events on the thumbnails forcing the user to use the back and next buttons forcing the slideshow to be linear. This would be great for a step by step tutorial.
- Add an image preloader.
- Make the enlarged images clickable so that you could link them to other site pages. This would make a great "special features" preview.
None of these are terribly difficult to do. We're going to take the last idea and make all of our enlargements clickable. Each of the enlargements will point to a unique web page. For the purposes of this demonstration, we'll have each bird image open that bird's Wikipedia page in a new browser window.
When we first set up the HTML for this slideshow we decided to use the HTML as our data file to drive the action. All of the data we need is stored in the unordered list of thumbnails. We can build on this idea by using the handy HTML5 "data-" attribute.
The data attribute is used to store small bits of data for which there is no more appropriate element available. The data attribute allows you to create your own, custom attribute, tailored to your particular situation. They are used for storing local bits of information needed locally, for a particular page.
The data attribute always begins with the keyword "data" followed by a hyphen, "-" followed by an identifier. You can learn about the data attribute over at HTML5Doctor:
The data attribute can be used by Javascript to make things happen. For example, let's pretend you building an employee contact page for a group of social workers who are both in the office and in the field working with clients. Your page needs to display on small smart phone screens and still look well on large monitor displays. The social workers tend to email each other when they are in the office and using their large monitors. When they are out in the field with clients, they are dependent on their smart phones and want one click access. There are many ways to design a page that would work great in both circumstances but one smart way would be to:
- Display each name with their phone number.
- Store the email address in a data attribute.
- When the page loads, evaluate the size of the display.
- If the display is under 640px on a side show the name and phone number on the assumption that the person is using a handheld and only wants the number.
- If the display is larger, assume that the user is on a laptop or desk top and wants to see both the phone number and the email address. Pull the email address out of the data attribute, display it and link it using Javascript.
Your HTML might look something like this:
John Doe: 800-555-1212
The Javascript can find the data attribute and use it to append an additional node to the div. In our next example we're going to store the a unique path for each image in a data attribute and use Javascript to link the enlargement correctly when the new image is displayed.
Duplicate your m13_slideshow.html file and name the new file "m13_slideshow_linked.html".
Find the enlargement image, it's the image with the id "lr". Wrap the image in an a tag and point the href to an appropriate page. Give the a tag the id "link". The paths in this example are all off site. It makes sense to use absolute URLs and open the pages in a new window. Use the target attribute to open the new page in a blank window like this:
Add a data attribute to each of the thumbnails. Name the data attribute "data-path" and use it to store the path to a web page. Here is an example of how this code should be done:
And here is the entire list with the data attributes in place:
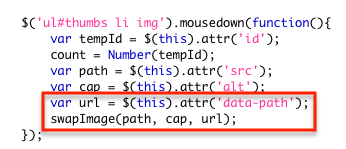
Updating the Javascript is very straight forward. The simplest approach would be to add another parameter to the swapImage function call. Right now our function takes two parameters: path and cap. We can a third and call it "url" Now our function call will look like this:
swapImage(path, cap url);
First let's update the event handlers. When a thumbnail is pressed, along with grabbing the src and the alt, we also grab the data-path attribute and pass it to swapImage() like this:
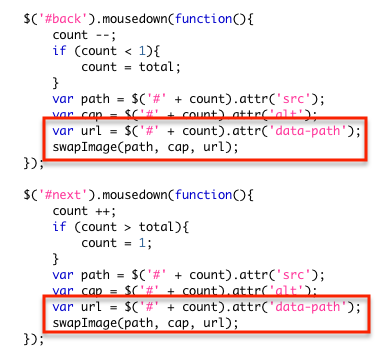
The same is true for the back and next buttons:
Finally we need to amend the swapImage() function. The first thing we need to do is add the new parameter to the parameters list.
Now it's an easy matter for our script to find the link with the id of "link". You can now change the href attribute using jQuery's attr() method like this:
SAVE! Open your page in a browser. Each of your enlargements is now uniquely linked.
Remember... time's running out to do your final...
Description
For this project you will be building a portfolio of your work. The portfolio will serve as a vehicle for you to display your work as you progress through your degree program. You are building a website for yourself to display your growing skills. This portfolio will evolve over the course of your education. As you take more courses you will have more work to show.
This is a professional portfolio, and as such it is a more targeted site. You should select and carefully edit the work you want to show. This portfolio is a demonstration of your professional skills and judgment.
Your target audience includes your department director, instructors, classmates, and eventually, future employers. You will use this site as part of your mid-point review presentation. The committee will want to know more about you. They will need to see demonstration of your technical skills as well as your design skills. As you think about this portfolio, consider how you want to be perceived and design accordingly.
Your portfolio should include the following sections:
- Home: to establish the look and feel of your site. To inform the users what to expect in your site.
- Personal history/Artist's statement (optional): this can be incorporated in the home page if desired.
- Resume: Must be in HTML with CSS. You can link to a PDF as well, but there needs to be an HTML version incorporated in the site.
- Portfolio: Include carefully chosen examples of your work. How you present them is up to you, but be sure that they read well on the Web. Extremely large images and videos will need to be optimized, and in some cases reduced to work well. If you have professional experience and wish to show some of that work as well, you should do so.
- Contact Page (Optional)
Final content and page list will vary somewhat from student to student -- the important thing is that the final piece fairly represents you.
A further consideration is that your portfolio is a "living" document. It is not a static brochure, but rather a growing, evolving site. As you think through the navigation, keep in mind that you will be updating this site in the future to include a growing body of work.
Each page must include:
- The site name and any branding you want associated with you
- Global navigation to all the sections of the site
- Local navigation, where appropriate
- A breadcrumb trail where appropriate and only if your site is deep enough to require one
- The section title
- The page title
- The content
- A foot with a copyright
Technical Requirement
This is a web-based portfolio. You should design using web "friendly" technologies. The site should be developed in HTML with external CSS and JavaScript. You may use Flash to enhance your site with animation and interactivity. This is an HTML class -- you may not build a Flash site. You may include sound files, video, animation, and anything else you feel will show your work off in its best light.
There must be HTML 5 in this project!
Purpose
- To create a showcase for your growing body of work.
- To gain experience designing a site that will be updated on a regular basis.
- To gather examples of your work and collect your creative history as a student.
Subscribe to:
Posts (Atom)